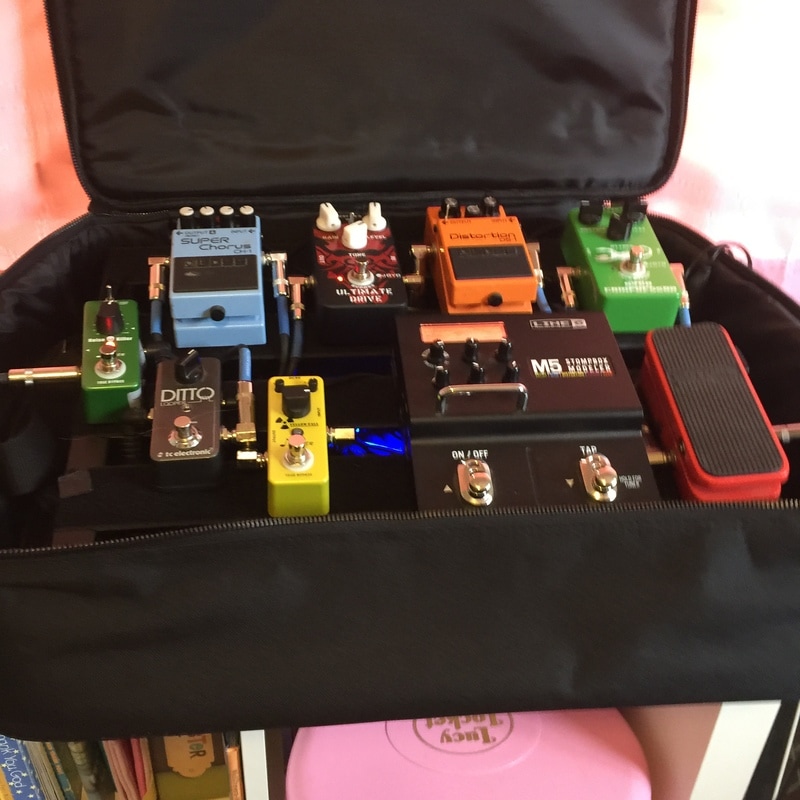
 Most recent Pedal Board 2017 I had to take time off acquiring pedals and these are what I have so far. I'll upload a better picture later. 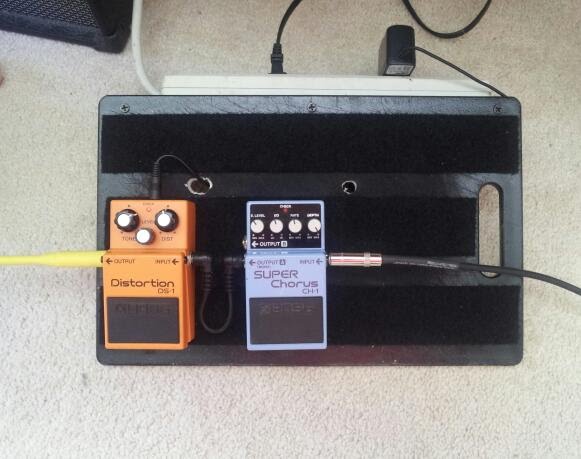 2012 Don't want to pay for a crazy over-priced guitar pedal board? Neither did I. I did some research and found a super cheap way to make your own cheap pedal board for under $15 bucks. Most pedal boards are WAY more expensive than this. You'll probably only have to buy one item too. Let me explain. I have been playing guitar for years but have never really put a ton of money into it. I have a few effects for in my arsenal but not an exorbitant amount. I needed a pedal board that could hold 4-5 pedals. I saw only one video on Youtube that had a guy with this idea. Here is what you'll need: a used chopping board from your kitchen, a 3x 1 piece of wood, three screws, industrial strength Velcro, some spray paint, a power strip, and your pedals. First off, drill three small holes into ones side of the chopping board. two by the edges and one in the middle. This will be for the wood screws. Now screw the 3x1 piece of pine board to the chopping board. it will now be on an angle. It's a good idea to place a few of your pedals on the board to get an idea of where they will be. Next you will need to drill a couple of holes for the AC adapter cords. I drilled a couple of holes about halfway from the bottom to the top. about the size of a nickel. Next, it's time to paint. Take your spray paint and paint the board the color you want. Let it dry. Now, cut the velcro into strips that fit a long the length of the chopping board. I used three strips. Now take the other part of the velcro and cut it to fit the bottom of your effect pedal. I used the loop side on the board and the hook side on the bottom of the pedals. Place the three strips of velcro on the board evenly spaced. It should already have a sticky side underneath so no glue is required. Now, on the piece of board that is holding it up, which is the vertical piece of board, place another piece of velcro on it and the other partner piece on the power strip. Depending on the size of your wooden piece you may be able to place the power strip underneath to conceal it. I didn't have enough room so I had to place my power strip on the outside. It's not as nice looking but is still functional. Once you've done that, you're all set. You've just made a really inexpensive pedal board! I only have two pedals, soon hopefully to add more, so I have room for at least two or three more pedals depending on what brand and type of pedal. I plan on getting a delay pedal and a wah wah pedal next. This should fill up my board. Then add a tuner an tremolo but will probably need a bigger board for that. Though you can always swap out the pedals you don't use often. If you want a case to put the whole board in to make it more transportable, Walmart has really cheap book bags. similar to a briefcase style. This will keep everything ( cables, patch chords, picks, capo, etc.) together. Enjoy your new pedal board! 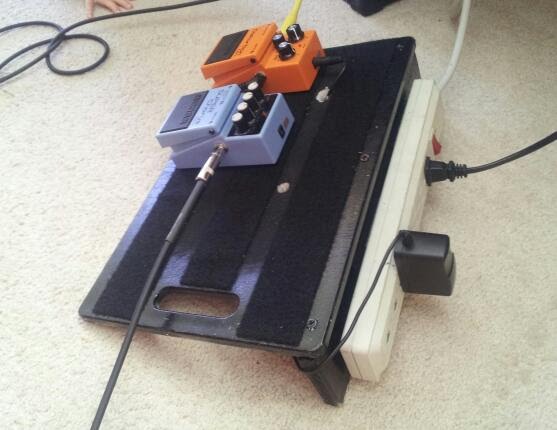
19 Comments
|
AuthorDenny Breese Archives
February 2019
Categories
All
|
 RSS Feed
